

A lot of gamers are talking about the CS:GO Mic in the gaming community and the issues faced by them while playing the game on a windows PC.
If you are one of them who fell prey to the CSGO Mic not working issue and lost your match then you are not alone. It is a common problem that many players are facing. A good practice is to use mic monitoring before entering any matches.
However, the good news is that there are several possible solutions that can help you fix the issue.
10 Possible Fixes for CSGO Mic Not Working In Windows
Fix 1: Check Your Microphone Settings
One of the simplest solutions to this issue is to set your microphone as the default device.
Here’s how you can do it:
- Press the Windows key + R to open the Run window. Then, type in “mmsys.cpl” and click OK to open the Sound settings.
- Switch to the Recording tab.
- Right-click on the microphone that you are currently using and select “Set as Default Device.”
- Right-click on your microphone again and select Properties. Then, go to the Levels tab and increase the volume for Microphone and Microphone Boost.
- Click Apply and then OK to save the changes you have made.
After performing these steps, restart CS:GO and check if the voice chat is working correctly. If the issue persists, you can try the other solutions mentioned below.
Fix 2: Check Your Microphone Hardware
Make sure your microphone is properly plugged in and turned on. Check if it is correctly connected to your PC or laptop.
If you are using a USB microphone, try plugging it into a different USB port.
You can also test your microphone on other applications like zoom or Discord to see if it works correctly. If it doesn’t work on other apps, then it’s probably a hardware issue.
Fix 3: Restart CS:GO
Restarting CS:GO is one of the easiest solutions to try when you encounter microphone issues. Simply close the game and relaunch it to see if the CS:GO microphone is working correctly.
Sometimes, the game may have encountered a glitch or a temporary error that restarting can fix.
This solution is quick and easy to perform, so it’s worth trying before moving on to other potential solutions.
Fix 4: Restart Your Computer
Restarting your computer is another solution that can help resolve the microphone issue. Headsets like the LogitechG320 and Razer Barracuda X can be easily fixed by simply restarting the computer.
When you restart your computer, any temporary software conflicts or issues that may be causing the microphone not to work can be resolved.
It can also refresh your system and free up any resources that may be occupied by other programs, which can potentially fix the problem.
This solution may take longer than simply restarting CS:GO, but it’s worth trying if the other solutions don’t work.
Fix 5: Update Your Audio Drivers
If the above solutions don’t work, you may need to check your system’s audio drivers. An outdated or corrupt audio driver can cause microphone issues not particularly with CS:GO but also with other gaming applications.
Signs of a problematic audio driver include mic not working, crackling sound, and poor sound quality.
Windows automatically downloads and installs driver updates.
However, if you wish, you can manually install audio driver updates by following the steps:
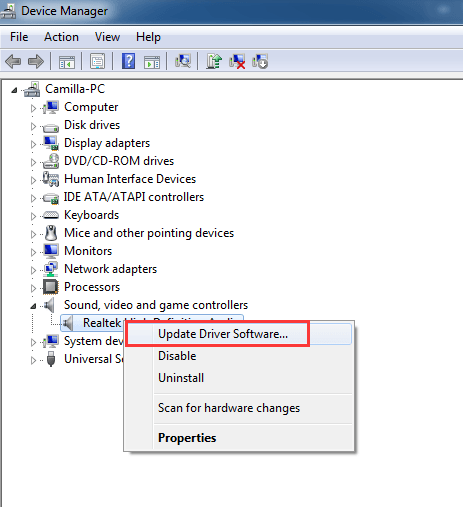
- Launch Device Manager and select the “Audio inputs and outputs” settings.
- Do Right-click with you mouse on the desired audio device and select “Update driver” in the context menu.
- Click on “Search automatically for drivers” and then wait for it to complete.
- Once you have downloaded the update, restart your system and check if the issue is resolved.
Alternatively, you can use any driver softwares to update the Windows. It can help download updates regularly and keep your audio driver up-to-date.
Fix 6: Verify the Game Files
Over time, Steam game files can become corrupted, causing various issues, including microphone problems in CS:GO.
To resolve this, you can use the Steam verification tool, which detects and replaces any corrupted files.
To confirm the integrity of CS:GO files using Steam, follow these steps:
- Open the Steam client on your PC.
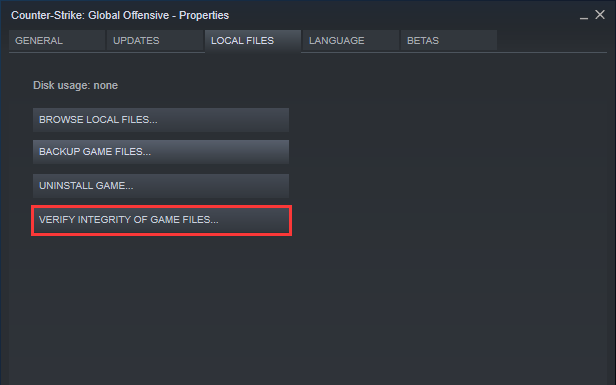
- Right-click on CS:GO in the Library tab and select Properties.
- Click on Local Files in the left panel.
- Select “Verify integrity of game files.”
- Steam will begin validating the files of CS:GO. Please note that this process can take some. Once complete, the status for repairs will be shown. Press Close, relaunch the application, and check if the microphone issue persists.
By following these steps, you can ensure that your CS:GO files are intact and not causing any problems with your microphone.
Fix 7: Disable Other Applications
Still experiencing microphone issues in CS:GO?
Other applications could be interfering with your audio settings. Some programs may use your microphone or audio output by default, preventing CS:GO from accessing these resources.
To check for this, you can disable other applications temporarily while playing CS:GO. Here’s how:
- Close all running applications except for CS:GO.
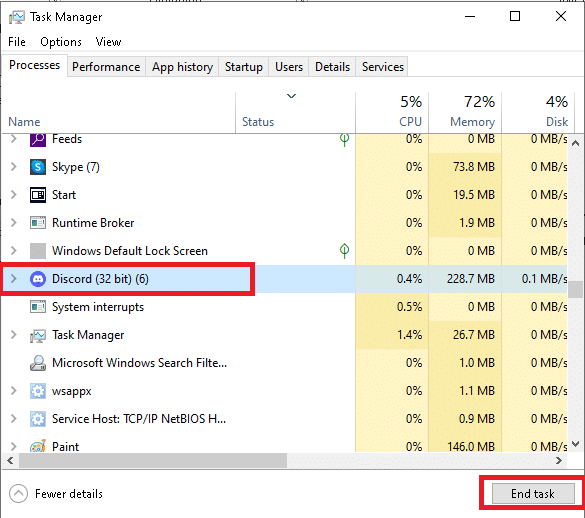
- Open the Windows task manager by pressing Ctrl + Shift + Esc.
- Click on the “Processes” tab and sort the list by “CPU” or “Memory” to identify any resource-intensive applications.
- Right-click on these applications and select “End task” to close them temporarily.
- Take an Online Mic Test to see if the problem still prevails or not and then launch the CS:GO application.
By giving priority to CS:GO for audio resources, you can ensure that your microphone works correctly while playing the game.
Fix 8: Restart Windows Audio Services
The Windows Audio service is responsible for managing audio across all installed applications.
If you have disabled this service or if it’s not working correctly, you may experience audio issues in various applications, including CS:GO.
To ensure that the Windows Audio service is up and running correctly, follow these steps:
- Open the Run Software. You can do so by hitting the Windows + R key.
- Type “services” in the Run box and press Enter.
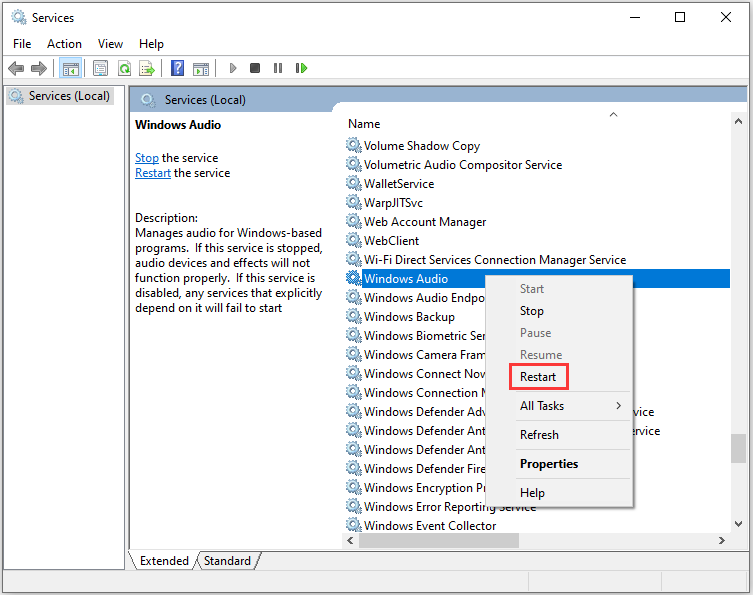
- Locate the “Windows Audio” service and click on it.
- Click the “Restart” button in the left panel.
- Confirm by clicking “Yes” on the pop-up dialog box.
By restarting the Windows Audio service, you can ensure that it is functioning correctly. It can potentially resolve any audio issues in CS:GO or other applications.
Fix 9: Disable Xbox Game Bar and Captures
Xbox Game Bar is an overlay feature that enables gamers to record clips and take screenshots of their gaming moments. However, it’s also known to cause microphone issues in various games, including CS:GO.
To resolve this issue, you can disable the Xbox Game Bar by following these steps:
- Open the Settings app and click on the “Gaming” option in the left panel.
- Select “Xbox Game Bar” from the options.
- Disable the “Open Xbox Game bar using this button” slider.
- Go back to the Gaming window and select “Captures”.
- Disable the toggle next to “Record what happened” and “Capture audio when recording a game”.
- Launch the game and check if the microphone issue is resolved.
By disabling the Xbox Mic you can eliminate the possibility of it causing any mic issues in CS:GO or other games.
Fix 10: Check CSGO Settings
To use the mic in CS:GO, you need to properly configure its settings. Ensure that you’ve set up everything you need for the microphone to work correctly by following these steps:
- Launch CS:GO and click on the Gear icon in the left panel.
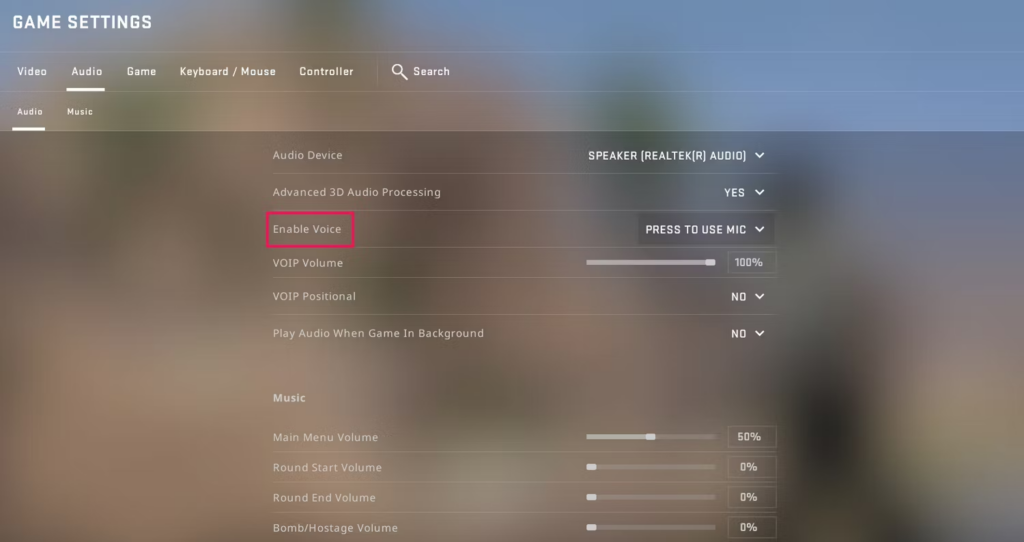
- Switch to the Audio tab and confirm that the “Enable Voice” option is properly configured.
- Switch to the Keyboard / Mouse tab and locate the “Use Mic” option.
- Confirm that the “Use Mic” option is enabled correctly, as it may have been deleted automatically for various reasons.
- After making the above changes, restart CS:GO and check if the problem has been resolved.
Make sure to double-check your settings before playing the game to avoid mic issues. You can also check these settings other games like Warzone if you face any issues with the mic
FAQs
Q1. How do I test my mic in CS:GO?
Ans. You can try checking your microphone by using the “Listen to this device” feature in Windows sound settings. Here’s how to do it:
- Open the Sound settings in Windows.
- Click on the “Recording devices” tab.
- Double-click on your microphone device to open its properties.
- Go to the “Listen” tab.
- Click on the “Listen to this device” checkbox.
- Speak into your microphone and check if you can hear your voice through the speakers.
If you can hear your voice clearly, then your microphone is working correctly, and the issue might be with CS:GO’s settings or the game itself.
Q2. How do I enable open mic in CS:GO?
Ans. The voice setting in CS:GO may sometimes be disabled, so it’s essential to check it first when troubleshooting mic issues. Here’s how you can do it:
- Open CS:GO.
- Click on the Settings icon and select the Audio tab.
- Select your default microphone from the Audio Device drop-down menu.
- Choose Press to Use Mic from the Enable Voice drop-down menu.
Q3. Why can’t i hear my teammates talk in CS:GO?
Ans. If you can’t hear your teammates in CS:GO, there are a few things you can try to troubleshoot the issue. First, launch CS:GO and click on the gear icon in the left panel. Then, go to the Audio tab and check the related audio settings to ensure they are turned on or set correctly. If everything seems to be in order, you can also try going to Game Settings. Select Communication to ensure that the correct settings are enabled for in-game communication.
Q4. Why can’t people hear me in game PC?
Ans. To make sure that your microphone is enabled in Windows, go to Windows Privacy settings. Select Microphone, and enable “Allow apps to access the microphone”. Additionally, you can check if your microphone is working correctly by listening to the device.
Q5. How do I configure my mic in CS:GO?
Ans. To adjust the microphone settings in CS:GO, go to the Settings button and select the Voice tab. From there, you can modify the Voice Input Device by selecting the microphone option and adjusting the volume accordingly. This will help prevent accidentally shouting or being too quiet while communicating with other players in the game.
Conclusion
These are some of the most effective solutions that can help you fix the CSGO mic not working problem. Try these solutions one by one until you find the one that works for you. If none of these solutions work, then you may want to seek help from the CS:GO community or the game developer’s support team.