
Logitech G230 is a popular gaming headset known for its loud sound and comfortable design.
However, some users have reportedly complaint about Logitech G230 Mic Not Working on their Windows 10 operating system.
This can be frustrating for gamers who rely on clear communication with their team members during online gameplay.
So let’s look at some troubleshooting tips to help you resolve the issue.
Possible Fixes to the Logitech G230 Mic Not Working Problem
Fix 1: Check Microphone Settings
If your Logitech G230 microphone is not working, it could be because it is not set as the default device or is disabled on your PC.
To check your microphone settings, follow these steps:
- Press Windows logo key + R to launch the Run dialog box. Type “control” and tap on Enter to launch the Control Panel.
- Click on “Hardware and Sound”.
- Select “Sound”.
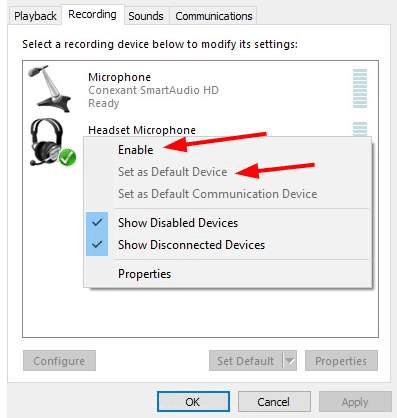
- Click on the “Recording” tab, and right-click on an empty space in the device list and choose “Show Disabled Devices”.
- Right-click on the “Headset Microphone” and select “Enable”.
- Select your microphone and choose “Set Default”.
- While in the Recording tab, speak into your microphone to check if it works properly. If it does, you will notice some green in the bar on the right side.
- Tap on “OK”.
Check if your Logitech G230 microphone is functional now. This headset is also equipped with a mic monitoring feature that helps the players to test the headset before starting a match
Fix 2: Allow Access To Microphone
Another reason why your Logitech G230 microphone may not be working is because Windows 10 and applications are not allowed to access it.
Here’s how you can check:
- Press Windows logo key + I to launch Windows Settings.
- Tap on “Privacy”.
- Select “Microphone” on the left-side panel.
- On the right side, if the microphone access for the device is disabled, choose “Change” to enable it.
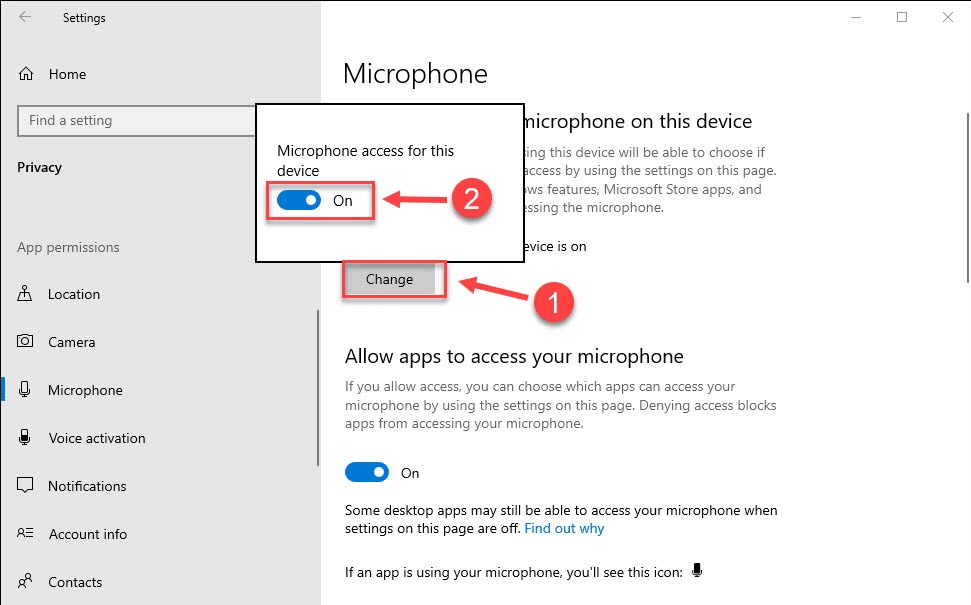
You should also allow all apps to access your microphone. If it is turned off, turn it on. Now check your Logitech G230 microphone by taking a Mic Test.
Fix 3: Update System OS
To resolve the issue with your Logitech G230 microphone, it is important to ensure that your operating system is up-to-date.
This can be done by following the steps below:
- Left-click Start and choose the Settings option. Alternatively, press Windows + I.
- Tap on “Windows Update”.
- Choose the “Check for updates” option.
- Windows will then automatically start searching for and downloading updates.
Updating your OS can provide you access to patches and updates that can help you fix existing bugs.
Fix 4: Reinstall Device Drivers
Before making any changes to your Logitech G203 settings, it’s recommended to reinstall the drivers first. This step can resolve issues caused by faulty drivers or improper device connection.
Here’s how to do it:
- Click on the Start button on your desktop.
- Search for “Device Manager” in the search bar.
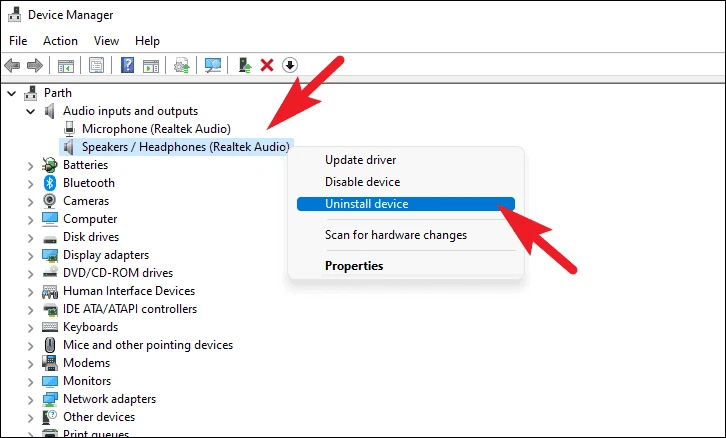
- In the Device Manager window, you’ll see a list of devices. Look for “Audio Inputs and Outputs” and click on it.
- Right-click on the microphone and select “Uninstall Device”.
- Go to “Video, Sound, and Games Controllers” and repeat step 4 to uninstall the microphone drivers from this section as well.
After completing the steps, try reconnecting your Logitech G203 and see if the microphone works.
Fix 5: Change Privacy Settings
To modify the privacy settings in Windows 10 and resolve any issues caused by these settings, follow the steps below:
- Click on the “Settings” icon from the Start menu.
- From the drop-down menu, select “Privacy” Settings.
- Next, select “Microphone” and click on “Change”.
- Verify that the microphone is activated.
- Ensure that permissions for all apps are turned on.
If privacy settings were the cause of the issue, chances are that it will be resolved after this step.
Fix 6: Update Audio Drivers
If your audio driver is too old or corrupted, it may be the source of this issue. Updating your audio driver to the most recent version will usually resolve the problem.
Here are the steps to update your audio driver using the Windows Device Manager:
- Press the Windows key + X on your keyboard and click on “Device Manager” from the menu that appears.
- In the Device Manager window, look for the “Sound, video and game controllers” section and click on the arrow to expand it.
- Right-click on your sound card or audio device and select “Update Driver” from the context menu.
- Select the option that says “Search automatically for drivers”.
- Windows will now search for and download any available updates for your audio driver. Follow the on-screen instructions to complete the installation.
Windows didn’t find any updates for your audio driver or encountered errors during the installation process? Try manually downloading and installing the latest driver from the manufacturer’s website.
Fix 7: Troubleshoot Existing Hardware Issues
If the previous fixes have not resolved the issue, it’s time to investigate potential hardware issues.
Follow the steps given below to troubleshoot hardware problems:
- Attempt connecting your Logitech microphone to another port on your computer. If the microphone operates in the other port, it indicates that the issue might be due to a faulty port.
- Try plugging your Logitech G230 microphone into another computer. If the microphone functions correctly on another PC, seek advice from the vendor of your PC. If the microphone still doesn’t work on another computer, get in touch with Logitech’s support team for assistance.
FAQs
Q1. How do I connect my Logitech microphone to Windows 10?
Ans. To connect your Logitech microphone to Windows 10, the first step is to ensure that it is properly plugged into your computer. Once you have done that, follow these steps:
- Click on the Start menu and select the Settings icon.
- In the Settings menu, click on System.
- From the System menu, select Sound.
- Under the Sound settings, locate the Input section.
- In the Choose your input device list, select the Logitech microphone or recording device you want to use.
Once you have completed these steps, your Logitech microphone should be connected to your Windows 10 PC and ready to use.
Q2. Why is Windows 10 not picking up my headset mic?
Ans. A reason why the microphone may not be detected is that it needs to be enabled in the Windows 10 privacy settings. To do this, follow these steps:
- Click on the Start menu and select the Settings icon.
- In the Settings menu, click on Privacy.
- Under Privacy settings, select Microphone.
- Ensure that the toggle switch is turned on to allow apps to access the microphone.
If these steps do not solve the issue, it could be a hardware problem with the headset or an outdated audio driver. It’s recommended to update the audio driver to the latest version and check if the microphone works. If the issue persists, contact the manufacturer’s support for further assistance.
Q3. How do I get my Logitech headset mic to work on my PC?
Ans. If you are having trouble connecting your Bluetooth headset to a device, you can try the following steps:
- Turn off your headset by sliding the off switch into the off position and keep it there for 5 seconds.
- Switch the headset back to Bluetooth mode.
- Press and hold the “Volume Up” button and “Track Forward” button simultaneously. Do this until the connection LED on the headset starts blinking rapidly.
- Your headset should now appear in the list of available Bluetooth devices on your device.
If the headset still does not appear in the list of available Bluetooth devices, make sure that it is fully charged. Check if the Bluetooth is enabled on the device you are trying to connect it to. If the problem persists, try resetting the headset by referring to the manufacturer’s instructions.
Q4. How do I fix my Logitech USB headset microphone?
Ans. To fix issues with your Logitech USB headset microphone:
- Adjust the headset volume and ensure it’s not on mute.
- Try a different USB port on your computer.
- Check microphone settings in your application and operating system.
- Update the headset drivers from the Logitech website.
- Reset the headset if needed, following the manufacturer’s instructions.
Contact Logitech customer support if the issue persists.
Q5. How do I activate my Logitech microphone?
Ans. To activate your Logitech microphone, follow these steps:
- Plug USB of the Logitech mic into the computer.
- Turn on your microphone by using the “Power” button
- Your computer’s operating system should automatically recognize the device and activate the microphone.
Once your microphone is activated, test it by going to your computer’s sound settings. Don’t forget to select the Logitech microphone as the default recording device. You can then try recording your voice or using it for other applications that require a microphone.
The Bottom Line
Having a Logitech G230 headset with a non-functioning microphone can be a hindrance to any user. This is especially true for gamers who need to communicate with their teammates during gameplay. We have discussed some of the possible causes of this issue. By following the troubleshooting tips, you should be able to resolve the Logitech G230 mic not working in Windows 10 problem.
If the issue persists, it may be best to contact Logitech customer support for further assistance. With a functioning microphone, you can enjoy uninterrupted communication during your gaming sessions.