


If you are a gamer or content creator, you understand the importance of having a high-quality microphone. The Razer Barracuda X or the Logitech G320 is a popular choice for its impressive sound quality and sleek design.
However, despite the reputation, some users have reported the issue of Razer Barracuda X Mic Not Working during long sessions.
We understand how frustrating it can be to deal with technical difficulties. This is especially true when it comes to critical gaming or work equipment.
So, let’s look at some of the common solutions to help you get back to using your microphone with ease.
9 Possible Fixes for Razer Barracuda X Mic Not Working
Solution 1: Check if the Connection is Strong
The first step in troubleshooting your Razer headset microphone is to ensure that the connection is solid.
Try unplugging the headset from the device and plugging it back in firmly. It’s possible that the connection may have become loose, causing the microphone to malfunction.
If the issue persists, try connecting the headset to another device to rule out any issues with the original device. Checking the connection is a quick and easy fix that can help resolve most problems with your headset. If you are looking for an alternative, then the Logictech Pro X Microphone is a good choice.
Solution 2: Make Your Headset Mic the Default Input Device
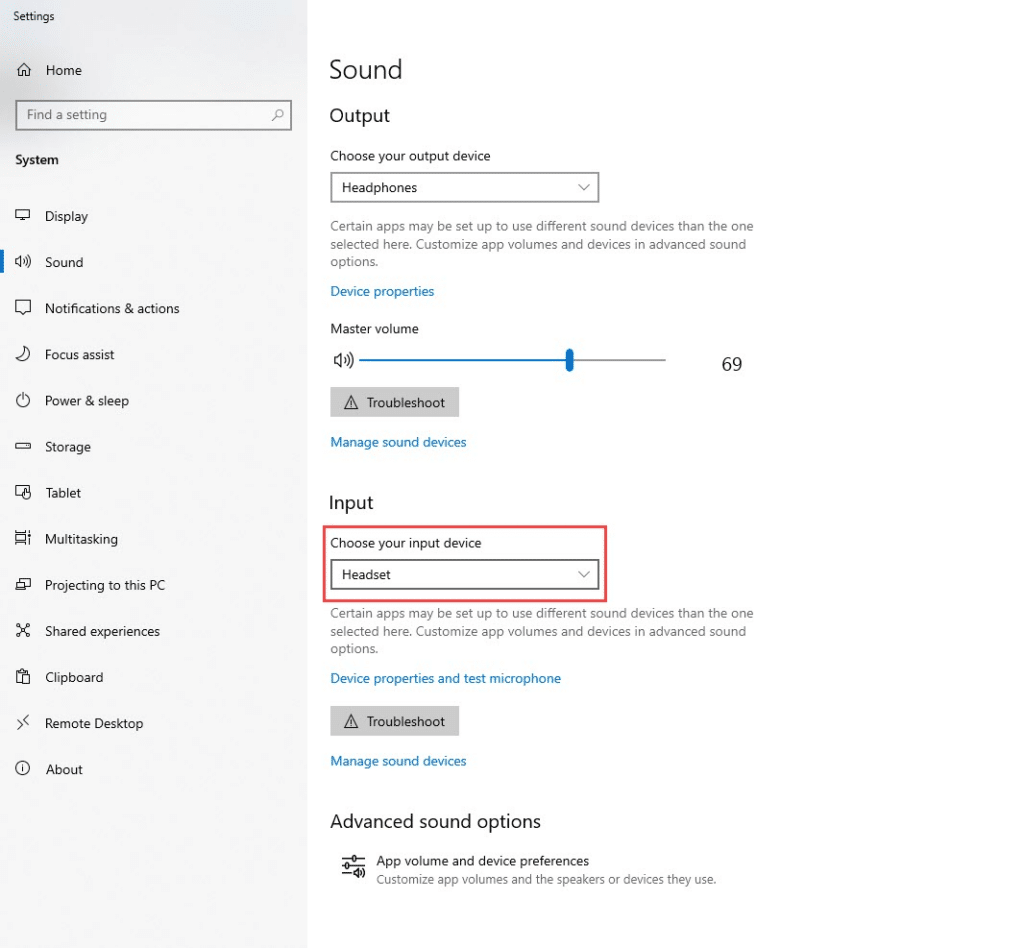
Another troubleshooting step to try is to set your headset mic as the input device. Here are the steps to manually set your Razer Barracuda X headset mic as the input device on your PC:
- Press the Windows logo key to launch the search bar.
- Type “sound input” in the search bar and select “Sound input device properties” from the search results.
- In the Sound settings window, select your Razer Barracuda X headset as the preferred input device. It may come up as “Razer Barracuda X” or simply “Headset”.
- Test your microphone to gauge if it’s functioning properly by using Mic Tester.
If you’ve already set your microphone as the input device but it’s still not picking up your voice, try the next troubleshooting step.
It’s important to ensure that your Razer Barracuda X headset mic is set up correctly.
This helps avoid any performance issues while using it for gaming, work, or other activities that require clear audio input.
Solution 3:Enable the Mic for Recording
Having trouble with your Razer Barracuda X microphone not working on your PC?
It can be frustrating and impact your ability to communicate clearly during gaming or other activities.
Here are the steps to enable the microphone on your Razer Barracuda X headset for recording:
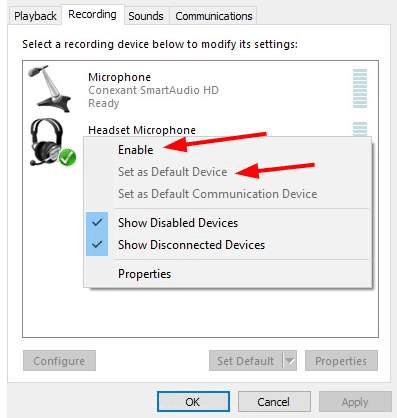
- Right-click on the speaker icon located on the taskbar and select “Sounds”.
- In the Sounds window, navigate to the “Recording” tab and check if your Razer Barracuda X headset is listed. If you can’t find it, right-click on any empty area within the window and select “Show Disabled Devices”.
- Right-click on your Razer Barracuda X headset and select “Enable”.
- Click on “Apply” and then “OK” to save the changes.
After enabling your headset microphone for recording, test it to see if it’s now functioning properly.
If the microphone still doesn’t work and records background noise, proceed to the next troubleshooting step to fix the issue.
Solution 4: Ensure the Microphone is Not Muted
One possible reason why your Razer Barracuda X microphone is not working could be due to the microphone mute button being activated. This is a common issue that can accidentally happen even in the Hyper Cloud 2 headset, but it’s easy to check to fix.
Look for the red LED light on the microphone tip to see if the mute button is activated. If the LED is on, press the mute button to turn it off and test your microphone again to see if it’s now working correctly.
Solution 5: Check Battery Level
Another possible reason could be low battery. The microphone is powered by the same battery that powers the headset, so if the battery level is low, it can affect the microphone’s performance.
To check if this is the issue, make sure to charge the headset fully before using it. Once fully charged, test the microphone again to see if it’s working correctly.
Solution 6: Update Firmware
To ensure optimal performance and fix any potential bugs, it’s essential to keep your Razer Barracuda X firmware up to date.

Luckily, Razer regularly releases firmware updates for its products. Follow the steps below to update your headset firmware:
- Go to the Razer support website and search for the Razer Barracuda X headset.
- Click on the Drivers & Downloads tab and select the latest firmware version for your operating system.
- Download and save the firmware file to your computer.
- Connect your Barracuda X headset to your PC using the provided USB Type-C wireless transceiver.
- Launch the Razer Synapse software on your PC and click on your headset’s icon to open the settings.
- Click on the Firmware tab, then click “Update” to start the firmware update process.
- Wait for the firmware update process to complete and do not disconnect your headset during the update.
- Once the update is finished, check if your headset microphone is working properly.
If your headset microphone still doesn’t work, contact Razer support for further assistance.
Solution 7: Look for Software Issues
It is possible that other software or drivers on your computer may conflict with the Razer Barracuda X headset. This might be resulting in microphone issues.
To address this, you can try disabling any other audio software or drivers that may be interfering with the headset.
By doing so, you can potentially fix the issue and get your microphone working again.
Solution 8: Provide Microphone Access to PC
All the headset settings have been configured but the microphone still doesn’t work? The culprit could be microphone settings on the computer.
Follow these steps to enable microphone access on your PC:
- Click the Windows logo key or tap on the search bar on the taskbar.
- Type “microphone” into the search bar, then choose “Microphone privacy settings.”
- Click “Change” and turn on microphone access for your device.
If this fix doesn’t work, there is one final option to try. But don’t worry, if not anything, Razer support is always there to come to your aid.
Solution 9: Update Audio Drivers
Another possible solution to fix the Razer Barracuda X mic not working is updating your audio driver. An outdated or corrupted driver may prevent the microphone from functioning properly.
Here’s how to update your audio driver:
- Press the Windows logo key + R for opening the Run dialog box.
- Write “devmgmt.msc” and hit Enter to open the Device Manager.
- Expand the “Audio inputs and outputs” category.
- Right-click on your Razer Barracuda X microphone and select “Update driver”.
- Select “Search automatically for drivers” and wait for the process to complete.
- If Windows finds an updated driver, follow the on-screen instructions to install it.
- Restart your PC and test your microphone again.
If Windows doesn’t find any updated driver, you can visit the manufacturer’s website. Feel free to download the latest audio driver from there.
Install the driver and restart your PC before testing your microphone. Updating your audio driver can often fix microphone issues on your PC.
FAQs
Q1. Is Razer Barracuda X good for mic?
Ans. According to our testing, the Razer Barracuda X (2022) boasts a superior microphone compared to other headsets in its class. Our results show that the microphone on the Razer Barracuda X (2022) performs exceptionally well. This is especially true while capturing voices with impressive clarity and definition.
Q2. Why is my Razer headphones mic not working?
Ans. Experiencing issues with distorted, muffled, buzzing noise, or static noise on your Razer microphone? Several factors could be at play. One possible cause could be the accumulation of dirt or debris in the audio ports and on the audio jack. Another potential culprit could be an improperly attached mic and audio jack.
Issues with hub connections can also cause problems with your Razer headset mic. It’s essential to carefully examine and troubleshoot each potential cause to identify the root of the problem and find a solution
Q3. How do I connect my mic to my Barracuda X?
Ans. To connect your mic to your Razer headset, start by plugging the Type-C wireless transceiver into your computer. Then, press and hold the power button on the headset until the status indicator lights up, or until you hear a tone. If the status indicator briefly becomes static, this indicates that the headset is now connected. Give it a few moments to fully establish the connection, and you should be good to go.
Q4. Does the Razer Barracuda have a built in mic?
Ans. Yes, the Razer Barracuda has a built-in microphone. It is equipped with integrated beamforming noise-canceling mics to make the audio louder. They are designed to pick up crystal-clear audio regardless of the environment. This holds regardless of whether you’re gaming at home or enjoying mobile entertainment outdoors.
The built-in mic is a convenient feature that eliminates the need for an external microphone. It ensures that you can communicate clearly with your teammates or audience.
Q5. How do I use my Razer mic on my PC?
Ans. To use your Razer microphone with your PC, begin by connecting it to the USB port using the Micro-USB to USB cable that came with the device. Once connected, right-click on the sound icon on the system tray of your PC and select “Open Sound settings.” In the Sound settings window, locate the “Input” section and select “Razer [name of your headphones]” from the list of available devices.
Set the Razer Seiren Mini as the default input device by clicking on the “Set Default” button below the device name. With these steps, your Razer microphone should now be set up as the default input device on your PC and ready to use.
The Bottom Line
The Razer Barracuda X provides excellent sound quality and comfort for gamers and content creators alike. However, as with any technology, issues may arise, and the microphone may stop working correctly. Following the troubleshooting steps outlined in this article can resolve most problems.
Remember to keep your drivers up to date. Check your settings and perform regular maintenance to enjoy your Razer mic’s optimal performance.